NIST 800-53 provides comprehensive security policies and controls, broadly covering five major areas:
Identify: Identification and management of assets, including risk management
Protect: Protection of assets and data security, including user access control and least-privileged access controls for NIST 800-53 privileged access management (PAM)
Detect: Continuous monitoring and discovery of anomalous activities
Respond: Methods and strategies for identifying and mitigating threats
Recovery: Restoration procedures for recovery from a system failure or attack
The NIST 800-53 framework comprises 20 control families that include over 1,000 individual controls. Collectively, these controls ensure the privacy and security of IT environments that manage sensitive or regulated data, including all U.S. federal information systems except those related to national security. NIST 800-53 classifies controls into three risk categories—low, moderate, and high—depending on their level of impact.
NIST 800-53 Control Families List
Access Control
Awareness and Training
Audit and Accountability
Assessment, Authorization, and Monitoring
Configuration Management
Contingency Planning
Identification and Authentication
Incident Response
Maintenance
Media Protection
Physical and Environmental Protection
Planning
Program Management
Personnel Security
Personally Identifiable Information (PII) Processing and Transparency
Risk Assessment
System and Services Acquisition
System and Communications Protection
System and Information Integrity
Supply Chain Risk Management
NIST 800-53 Compliance Checklist Overview
The process of becoming NIST 800-53 compliant can be lengthy. Organizations might need to develop new internal processes and establish stronger policies for securing physical assets and facilities. In addition, initiatives can require an investment in hardware or software, and existing systems might need to be reconfigured or integrated.
Compliance begins with a basic understanding of all 20 NIST 800-53 control families and their scope.
Additionally, NIST requires organizations to appoint an individual or team responsible for assessing, implementing, monitoring, and updating the controls to maintain ongoing compliance. In order to customize the controls to meet the needs of the organization, the designated implementation person or team will need a solid grasp of existing policies, standard operating procedures, and systems.
NIST 800-53 Checklist: 5 Steps to Compliance
Organizations can achieve compliance across all systems and networks, as NIST 800-53 controls apply to both cloud and traditional environments.
While all organizations must meet the specified minimum requirements for compliance, those needing more robust measures can opt to implement additional controls from the NIST 800-53 catalog. A customized implementation increases security and privacy, ensures consistent application across the entire IT infrastructure, and protects against a wider variety of threats.
The following NIST audit checklist outlines the five steps to achieving compliance:
Step 2: Use control enhancements to fortify the baseline
Expand upon the baseline controls by implementing control enhancements within each family.
Step 3: Document controls to prove compliance
Keep detailed records of implemented controls, processes, and related activities to provide evidence of compliance to auditors.
Step 4: Perform routine and emergency audits
Maintain and continuously improve compliance by conducting audits on a regular schedule and after a security incident occurs.
Step 5: Provide ongoing training
Educate all employees on security policies and train IT teams how to follow best practices for identifying and mitigating cybersecurity risks. Ensure compliance teams stay current with revisions to the NIST 800-53 framework.
NIST 800-53 Implementation Tips
Although NIST 800-53 is mandatory for most federal agencies, organizations in the private sector can choose to implement ISO 27001 instead. So, what’s the difference between NIST 800-53 vs. ISO 27001? Both standards are similar in structure and content. The biggest difference is scale—ISO 27001 is a global framework, whereas NIST 800-53 is limited to the U.S.
Before adopting NIST 800-53, organizations need to examine all existing policies relevant to the implementation. This assessment should also consider how NIST 800-53 controls might complement other implemented frameworks, such as
Federal Information Security Management Act (FISMA)
Federal Information Processing Standards (FIPS)
Payment Card Industry Data Security Standard (PCI DSS)
Health Insurance Portability and Accountability Act (HIPAA)
In addition, organizations must identify sensitive data, including where it is stored and how it is received and transmitted. Data should be classified according to its value to determine what control level should be assigned to each category of data.
After assessing its current security posture and determining an acceptable level of risk, organizations can identify any gaps in their security protocols and take remedial actions. It is imperative to develop a strategic plan that establishes goals, details each step of the implementation, and defines roles and responsibilities. This plan should be reviewed and updated to stay current with evolving business requirements and security standards.
How StrongDM Simplifies NIST 800-53 Compliance
StrongDM helps organizations leverage the robust NIST 800-53 framework to improve their security posture while also maintaining strict compliance with NIST standards. With StrongDM, it’s easy to map organizational policies and procedures to NIST requirements and enhance the baseline by selectively applying low-, moderate-, and high-impact controls from the NIST 800-53 controls list.
StrongDM enables organizations to adhere to their secure access policies, additionally, the granular audit logging improves the ability to detect and respond to potential threats. Comprehensive audit logs support investigations and simplify NIST compliance audits
Achieve NIST Compliance Effortlessly with StrongDM
StrongDM streamlines NIST 800-53 implementation and auditing, making it easier than ever to ensure the security, privacy, and integrity of your data and information systems both on-premises and in the cloud. Choosing StrongDM as your partner will keep your mission-critical infrastructure safe and eliminate the struggles organizations commonly face as they strive to achieve and maintain regulatory compliance.
Want to see how StrongDM can help your organization simplify NIST compliance? Sign up for a free demo today.
About the Author
Schuyler Brown, Co-founder / CCO, began working with startups as one of the first employees at Cross Commerce Media. Since then, he has worked at the venture capital firms DFJ Gotham and High Peaks Venture Partners. He is also the host of Founders@Fail and author of Inc.com’s “Failing Forward” column, where he interviews veteran entrepreneurs about the bumps, bruises, and reality of life in the startup trenches. His leadership philosophy: be humble enough to realize you don’t know everything and curious enough to want to learn more. He holds a B.A. and M.B.A. from Columbia University.
How to deploy New Relic infrastructure using AWS CloudFormation
Before we start, though, it might help to know more about CloudFormation. Here’s how AWS describes it:
AWS CloudFormation provides a common language for you to describe and provision all the infrastructure resources in your cloud environment. CloudFormation allows you to use a simple text file to model and provision, in an automated and secure manner, all the resources needed for your applications across all regions and accounts. This file serves as the single source of truth for your cloud environment.
A single file? Sounds too good to be true—but it’s not!
CloudFormation lets you create whole environments of AWS services, including Amazon Virtual Private Cloud (Amazon VPC), Amazon EC2, Amazon S3, Amazon EC2 security groups, and many more. And you can use these CloudFormation templates repeatedly, making it super easy to launch a complex environment with just a few clicks.
Now that you know what CloudFormation is, let’s walk through a simple example of using it to launch an Amazon Linux v2 T2 instance that automatically installs the New Relic infrastructure monitoring agent. The purpose of this post is to provide you with an example you can use to design your CloudFormation scripts.
Programming fun!#?@
Before we get started, though, there’s one thing I need to warn you about. Most of what goes into writing an AWS CloudFormation document is pretty straightforward. However, when you get to the part where you are writing your scripts in either BASH or Windows PowerShell, be aware that you are also wrapping that code within JSON. This means you need to do two levels of debugging: one for JSON and another for the BASH or PowerShell script.
Another tip: If you can, create the BASH or PowerShell script in a live environment first. Make sure it works, then take that working script and add it to your JSON document. You’ll still need to replace some of the code with parameters where necessary, but at least you’ll reduce the debugging as much as possible.
With that in mind, let’s dive in.
How to use the CloudFormation template
1. From the AWS Console, open CloudFormation (located in the Management Tools section).
4. Select Next, and in the Specify stack details interface, give this stack a name that makes sense for your needs, for example, NR-infrastructure.
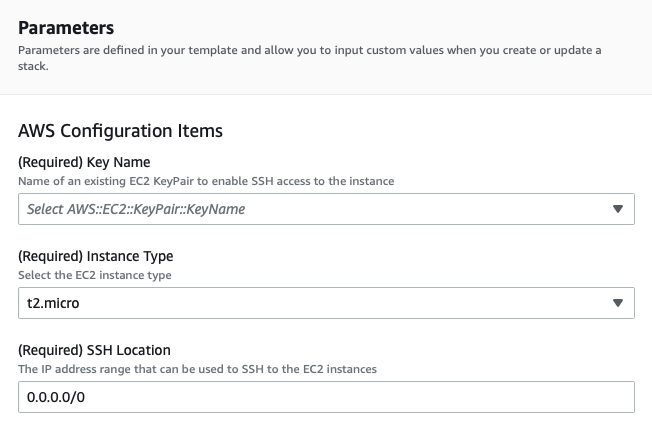
5. Then enter the AWS Configurations Items for Key Name (your key pair), Instance Type, and SSH Location.
Note: It’s not mandatory for this tutorial, but it’s a good idea to lock down the SSH location for better security. The 0.0.0.0/0 in this example screenshot is open to the whole world.
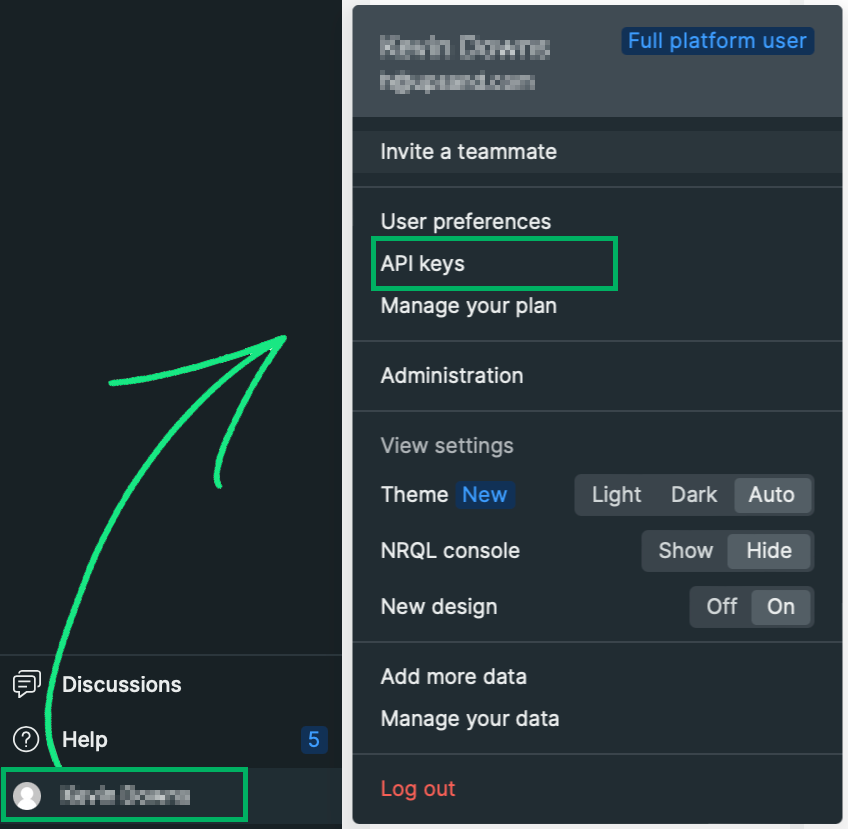
6. After you finish inputting the AWS Configuration Items, you’ll add your New Relic ingest-license key (required). You can find this ingest-license key under API keys in the New Relic console.
Then paste it in here:
7. Next, you’ll complete the New Relic optional configuration items. Set the Display Name appropriate for your instance. See our infrastructure agent configuration settings documentation for more information. You can modify your CloudFormation script to include other available parameters if you’d like.
8. Finally, set any other New Relic optional custom configuration items you want to use.
9. When you finish the configuration section, select Next. You’ll be prompted to set some additional optional settings. These include tags (name your instance with the Name/[name] key/value pair), permissions, stack failure options, and other advanced options. Add or select any items you wish, and then select Next.
10. CloudFormation opens a review screen containing all the items you’ve entered. Select Submit to build your CloudFormation stack. (Note that at this point, Amazon will charge you for the AWS resources—an EC2 instance—used when you create a stack from this template.)
Wrap it up
This example launches an Amazon Linux v2 EC2 instance attached to a Security Group that opens up ports 80 (HTTP) and 22 (SSH). This instance also configures and installs the New Relic infrastructure monitoring agent.
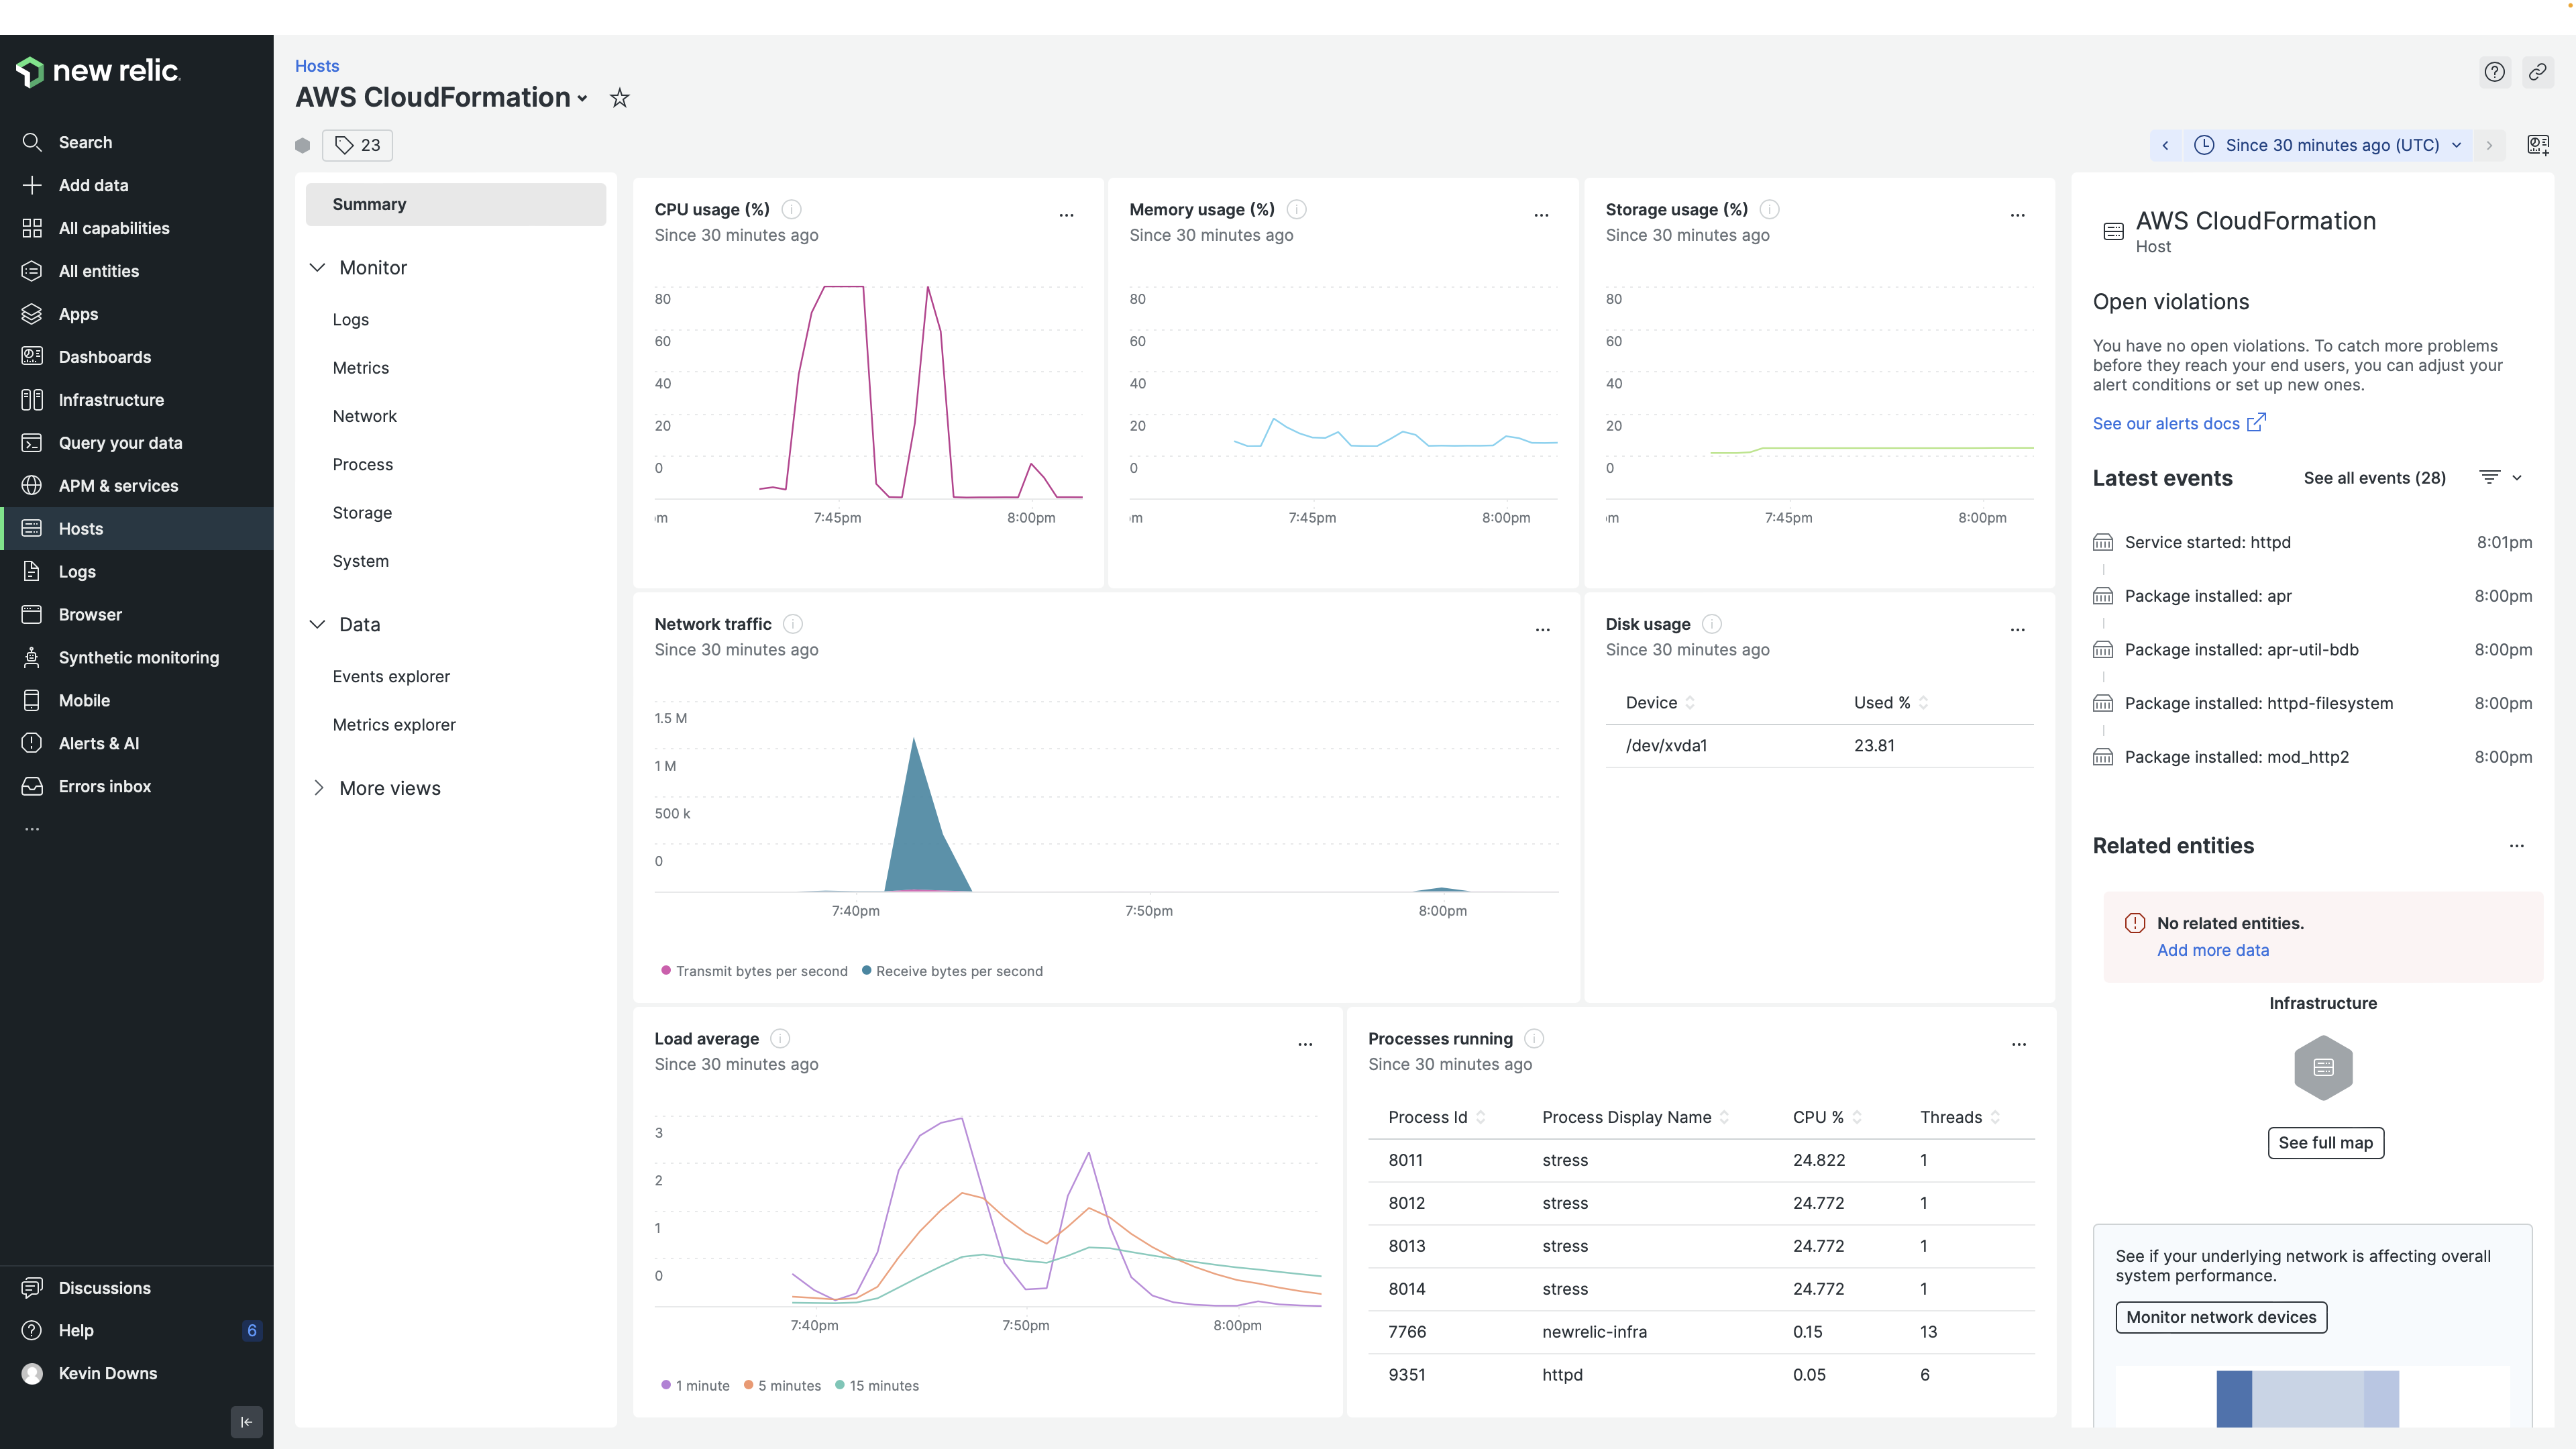
Head to your New Relic console to see your new instance displayed there. It takes just about one minute!
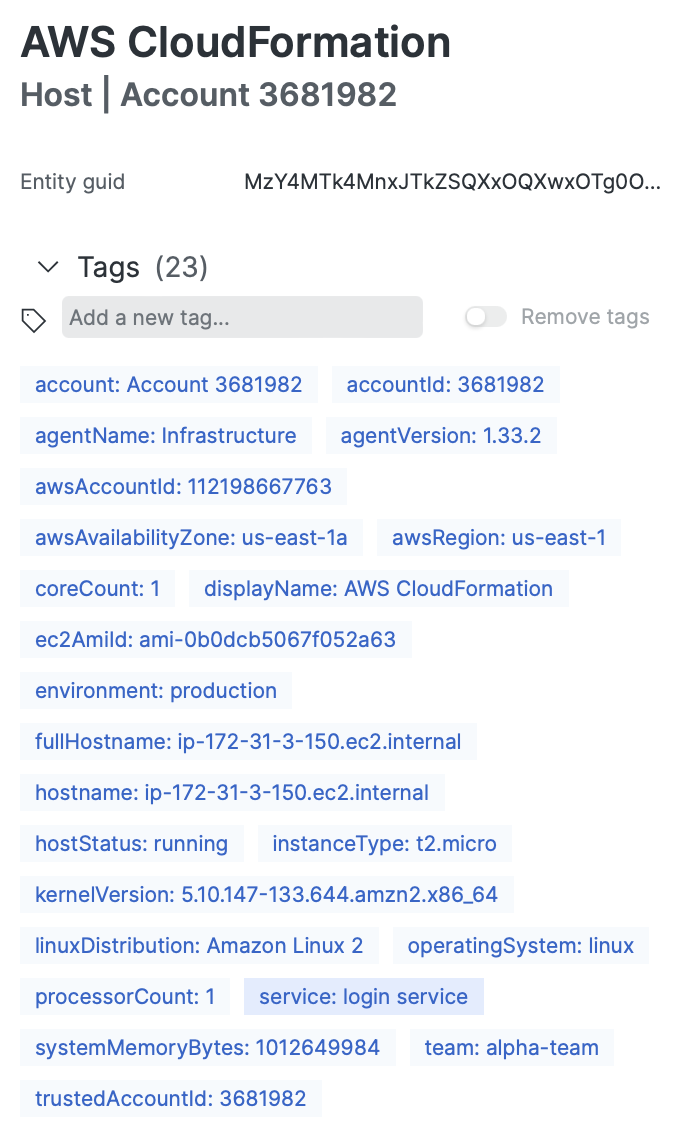
You can also see the instance metadata available to filter and chart. Notice the custom attributes are also available.
Kevin Downs, is a Solutions Strategy Director at New Relic, Kevin has deep knowledge of IT Ops and the cloud industry. He works with customers and partners to assist in their cloud adoption journeys. He’s been in the enterprise software industry for more than 20 years, including 12 years as a customer facing solutions architect, selling enterprise software solutions to all verticals.
6 Priorities for Ops in a ‘Serverless’ World
What “serverless” really means
AWS Lambda is sometimes incorrectly referred to by the generic name “serverless.” However, serverless is a more general term that includes all cloud services that don’t require you, the administrator, to spin up a server to run it. Lambda is just one such cloud service. Another example of a serverless service is notification. AWS has a service called Amazon Simple Notification Service (SNS). You don’t spin up a server and install SNS on it—you consume SNS.
There are many other examples of serverless services, so when I refer to serverless, I’m talking about any and all cloud services that don’t require (or allow) you to administer a server.
Still, although various serverless services have been around for a while now, it was AWS Lambda that dealt the first real death blow for servers as we’ve known and used them. Since then, both Microsoft Azure and Google Cloud Platform have come out with their own answers to Lambda called Functions. I’ll use the generic term “functions” to refer to this type of serverless service.
A new role for ops in a serverless world
Lambda’s debut in 2014 prompted me to ponder where operations (the ops part of DevOps) should focus its priorities in a world where developers (the dev part of DevOps) have the ability to spin up, scale up, scale out, consume, repurpose, scale down, scale in, shut down, and retire infrastructure on their own. The fact that developers can now do all of this without looking over the wall for operations support represents a huge shift in workflow. I have total respect for developers, but after two decades on the technical support and monitoring side of the business, sometimes I feel like they’ve made off with the keys to the cloud candy store—and that’s a good thing!
So where is all this brave new serverless stuff going to take operations? Should operations staff start polishing their resumes or think about switching careers? Basically, should operations be worried their role is in jeopardy?
The answer is no, not by a long shot. Developers are not going to take over operations’ job responsibilities. Robots are not going to invade our domain and mock our pocket protectors. In other words …
Six priorities ops should focus on
Of course, that doesn’t mean that nothing is going to change. The rise of serverless and functions and the empowerment of developers will indeed affect how ops teams work. Given that, I have six suggestions (in alphabetical order) for where ops folks should focus their priorities in a DevOps serverless world:
1. Automation
As developers increasingly employ powerful scripted architecture services, operations will need to make sure they are one step (if not many steps) ahead. That means everything from checking to see if all the components are running correctly to making sure developers are cleaning up after themselves (“Are you done with that container?”). Operations folks must get good at automating their daily tasks, fast! Remember, developers are using that same automation to create infrastructure and functions as fast as they can, too.
My recommendation: Study up on DevOps deployment orchestration tools such as AWS CloudFormation and similar services from other cloud vendors.
2. Cost optimization
This issue has been ramping up for a while. Once upon a time, IT budgets were authorized, projects were approved, and infrastructure was purchased. Both developers and operations didn’t really care about costs because that was all handled at the project-approval level. After that, developers were the consumers of infrastructure and operations was there to support that infrastructure, keeping the lights on.
Now, operations has a large role to play in understanding where and how to balance cloud-computing’s three-legged stool: availability, performance, and cost. Ops is uniquely positioned to answer such questions as, Are oversized instances being used? Is the autoscaler properly configured to scale down? Are storage and database resources properly being consumed? This becomes essential as developers gain a seemingly unfettered ability to create infrastructure and code functions. In this new environment, operations is the first line of defense against unexpected cloud bills.
My recommendation: Become familiar with how cloud vendors charge for their services and shine a light into that dark, scary place (see “Monitoring” below).
3. Disaster recovery
We all know things fail, even cloud services. Operations will always need to think about worst-case scenarios and make sure the environments being created are properly configured for failover. We have come a long way from offsite tape-backup repositories, but the same theories apply: what happens if this part of the architecture fails? Operations needs to make sure that as developers script infrastructure and code functions, failover strategies are in place.
My recommendation: Break things on purpose (in development environments, of course) to learn how to create fault-tolerant, multi-region architectures … then try to break those.
4. Monitoring
This one can’t be overemphasized: monitor everything you can! If you don’t monitor it, you can’t know if it’s working (or was working) correctly or at all. In a cloud world, monitoring becomes more important as services that were running one minute can be decommissioned in the blink of an eye. Operations needs to monitor serverless services to make sure they are performing (or did perform) as expected. Monitoring cloud services gives operations essential information to improve future cloud service usage.
My recommendation: Incorporate the cloud vendor’s built-in monitoring where appropriate. However, do you fully trust the fox to guard the hen house? Look to third-party monitoring solutions to gain an unbiased view. Critically, a third-party monitoring solution is essential to fully instrument and understand complex multi-cloud as well as hybrid (cloud and on-premise) architectures. Only then will you be able to understand the complete picture, an end-to-end monitoring view that shows your applications and their relationships to the cloud services they rely upon.
5. Security
Cloud-based security can actually be more secure than the on-premise variety. Yet, “with great power comes great responsibility.” Operations still needs to manage, control, and maintain proper access rights to applications and systems to minimize vulnerability to breaches and avoid improperly exposing private data. With the rise of scripted infrastructure and functions, ops must offer the required cloud services to devs while making sure that those services are secured properly.
My recommendation: Establish best-practice security processes as recommended by your cloud vendors and incorporate a cloud security expert into your cloud journey (either an internal stakeholder or an external resource).
6. Troubleshooting
Always an essential skill for operations, troubleshooting is pretty much what ops does. That’s not likely to change—operations will always need to figure out what went wrong. With cloud services, though, troubleshooting can become even more complex as operations stretches to take into account things like decoupled applications, scripted infrastructure, and functions.
Recommendation: Keep doing what you’re doing. You wouldn’t be in operations if you didn’t have an inner Sherlock Holmes lurking around in there somewhere.
No rest for the weary ops team
You may be thinking, “We just got here. We just moved to the cloud. We moved our physical servers to instances. We moved our databases as well. Even though we lost a little visibility into the underpinning infrastructure, we gained some cool new features and abilities (I’m looking at you AWS CloudFormation). Now, they go ahead and pull the rug out from under us with this whole functions serverless thing. Can’t we just pause for a little bit?”
No, that’s not going to happen. The world is moving rapidly toward serverless as the default option. Of course, not everything currently lends itself well to serverless and/or functions, so it may take a few years for the avalanche to show itself, but, ready or not, it’s coming!
Fortunately, operations teams are uniquely suited to support our organizations during this next phase of the cloud journey. We may need to learn a few new tools and tricks, but that’s always been part of the operations job description, right?
Kevin Downs, As Solutions Strategy Director at New Relic, Kevin has deep knowledge of IT Ops and the cloud industry. He works with customers and partners to assist in their cloud adoption journeys. He’s been in the enterprise software industry for more than 20 years, including 12 years as a customer facing solutions architect, selling enterprise software solutions to all verticals.
PAM Pricing Breakdown from A to Z (with Your Expected ROI)
That’s why companies need to calculate what kind of ROI they will get when choosing a PAM solution, in addition to evaluating privileged access management pricing. An ROI calculator can help as they look at the kind of returns achievable for DevOps/Engineering teams, Security teams, and the company.
Calculating the ROI of PAM for DevOps/Engineering Teams
First, consider the DevOps/Engineering teams. They’re responsible for building the product and need to gain access to critical infrastructure to develop, test, and release. But if they can’t get into these systems, they lose productivity, resulting in missed deadlines and missed SLAs.
Onboarding cost
As companies grow, they bring on new DevOps and/or Engineering team members But getting them access to critical systems may take some time. The right PAM solution will make onboarding much faster, allowing them to get to work. With a PAM solution that simplifies onboarding, organizations save an average of $182,000 annually. Here are some questions to ask when evaluating the onboarding costs of privileged access management solutions.
How many engineers do you typically onboard per year?
For larger companies that aren’t bringing on more than one or two new hires yearly, maybe this doesn’t matter. But for those that are constantly hiring new engineers, the hours spent onboarding new hires can quickly add up.
How many admin hours does it take to provision credentials for each new hire?
In addition to the number of engineers being onboarded, it is also important to consider how long it takes to provision their credentials. A long provisioning process not only keeps the new hire from getting started but also steals away time from admins who could be working on revenue-generating projects.
How many hours does it take for team members to receive credentials?
When team members need access to new or different resources, waiting hours can hinder their ability to do their jobs.
Privilege escalation cost
Examining privileged access management pricing also means looking at what it costs when organizations have to escalate privileges. Privilege escalations cost organizations an average of $139,000 annually. Here are some questions to ask while evaluating PAM solutions.
How many access escalation requests do you receive per year?
As projects become more complex, engineers need more access to resources so they can develop and test products. The more engineers a company has, the more access escalation requests they’ll need to manage. . These requests must be addressed so engineers can do their jobs.
How many admin hours are required to provision credentials?
To grant engineers enhanced access, admin hours will be required, particularly if these escalations are being provisioned manually. Admins may have to confirm that the access is needed or engage in other manual verification tasks, eating up their valuable time.
How many staff hours are spent waiting to receive credentials?
Engineers don’t ask for escalated privileges lightly. In some cases, they may need immediate access for incident response. The longer they wait, the more likely something will go wrong, requiring even more urgent triage.
Offboarding cost
Securing access to resources also means decommissioning users when they leave the organization. If this is a time-consuming process, it can easily chip away at any ROI from the PAM solution. The average organization wastes $11,000 annually on inefficient offboarding. Here are questions to ask during the PAM evaluation process.
How many engineers depart your organization every year?
As with onboarding many new users, decommissioning user access manually can quickly add up as engineers leave the organization. Additionally, manual processes mean that users may not be deactivated immediately, leaving the organization open to attack.
How many admin hours are required to revoke their credentials?
Theoretically, it shouldn’t take long to revoke credentials, but if an engineer has access to dozens of systems, an admin may spend multiple hours identifying what they could access and then revoking the credentials.
What’s the ROI of PAM for DevOps/Engineering teams?
Choosing the right PAM solution means improving productivity for the DevOps/Engineering teams while reducing the admin hours required to provision and revoke access. The average organization can save $193,000 due to the time saved on onboarding, offboarding, and privilege escalation tasks.
Calculating the ROI of PAM for Security Teams
PAM is also essential for security teams, helping them prevent outsiders from accessing critical resources. Should an incident occur, a PAM solution can help them discover what happened and take steps to avoid it in the future. As organizations evaluate privileged access management solution pricing for security teams, here are questions to ask.
Incident response cost questions
Responding to incidents pulls security teams away from proactively defending systems to reacting to a breach. It can take days, if not weeks or months, to gather enough evidence to identify where things went wrong and prevent a future breach. The organization can save $563,000 due to fewer engineering hours needed for evidence collections using the right PAM solution.
How many security incidents do you have per year?
Every organization has security incidents, ranging from mildly suspicious activity to full-scale data breaches. Each incident requires a postmortem to determine what caused it.
How many technical staff members are typically involved per incident?
The number of technical staff members that are involved – and have to take time to respond will depend on the type of incident. Is it operational, or is it a security incident like a data breach, internal disclosure, or vulnerability exploit? The investigation can require anywhere from 3-10 of your employees.
How many hours does it take to gather evidence?
Without a simple way to gather evidence, it may take more hours than estimated to understand what happened, how it happened, and how it can be prevented.
Audit response cost questions
Finally, audits are a part of doing business. When companies need to answer hard questions, they must gather evidence. The right PAM solution can save an average of $60,000 annually on evidence collection during audits. Here are key questions to determine privileged access management pricing for audits.
How many audits are run per year?
The number of audits being run every year can vary, but the more audits being conducted, the more technical team time will be needed to piece together an audit trail to satisfactorily answer questions.
How many access control questions are asked per audit?
The number of access control questions will vary based on the compliance framework. However, you can expect 15-30 questions to be based on access controls. For every question, team members will need to gather evidence.
How many hours does it take to answer each question?
The time it takes to answer each question also matters. Suppose it takes five hours to answer each question, and there are five access control questions. In that case, that’s 25 hours taken away from more strategic initiatives.
What’s the ROI of PAM for Security teams?
Between the savings from incident response and audits, the average ROI of PAM for security teams is $623,000 annually.
The Total ROI of PAM for Your Company
Choosing the right PAM solution provides strong ROI for the entire company. Combining the ROI for DevOps/Engineering and Security teams results in $816,000 saved annually.
How Much Does a PAM Solution Cost?
Privileged access management pricing shouldn’t be complicated. StrongDM offers a simple, straightforward pricing model that includes all features with no metering and no data limits. When compared to the ROI that StrongDM delivers, organizations may actually see StrongDM pay for itself.
Why Choose StrongDM as Your PAM Solution?
With its straightforward pricing, simplified access management, and inherent security, StrongDM brings a lot of value to organizations grappling with privileged access management. Companies can quickly deploy StrongDM in a matter of hours to manage access to databases, servers, cloud resources, web applications, and more. DevOps and engineering teams can access resources quickly and securely, allowing them to do their jobs faster. Because it creates a clear audit trail, security teams have what they need to respond to incidents or answer auditors’ questions in minutes, not hours or days.
But most importantly, the ROI can’t be beaten. Organizations can save hundreds of thousands of dollars by using StrongDM, making it a clear choice for your PAM solution.
Andrew Magnusson, Director, Global Customer Engineering, has worked in the information security industry for 20 years on tasks ranging from firewall administration to network security monitoring. His obsession with getting people access to answers led him to publish Practical Vulnerability Management with No Starch Press in 2020. He holds a B.A. in Philosophy from Clark University, an M.A. in Philosophy from the University of Connecticut, and an M.S. in Information Management from the University of Washington.
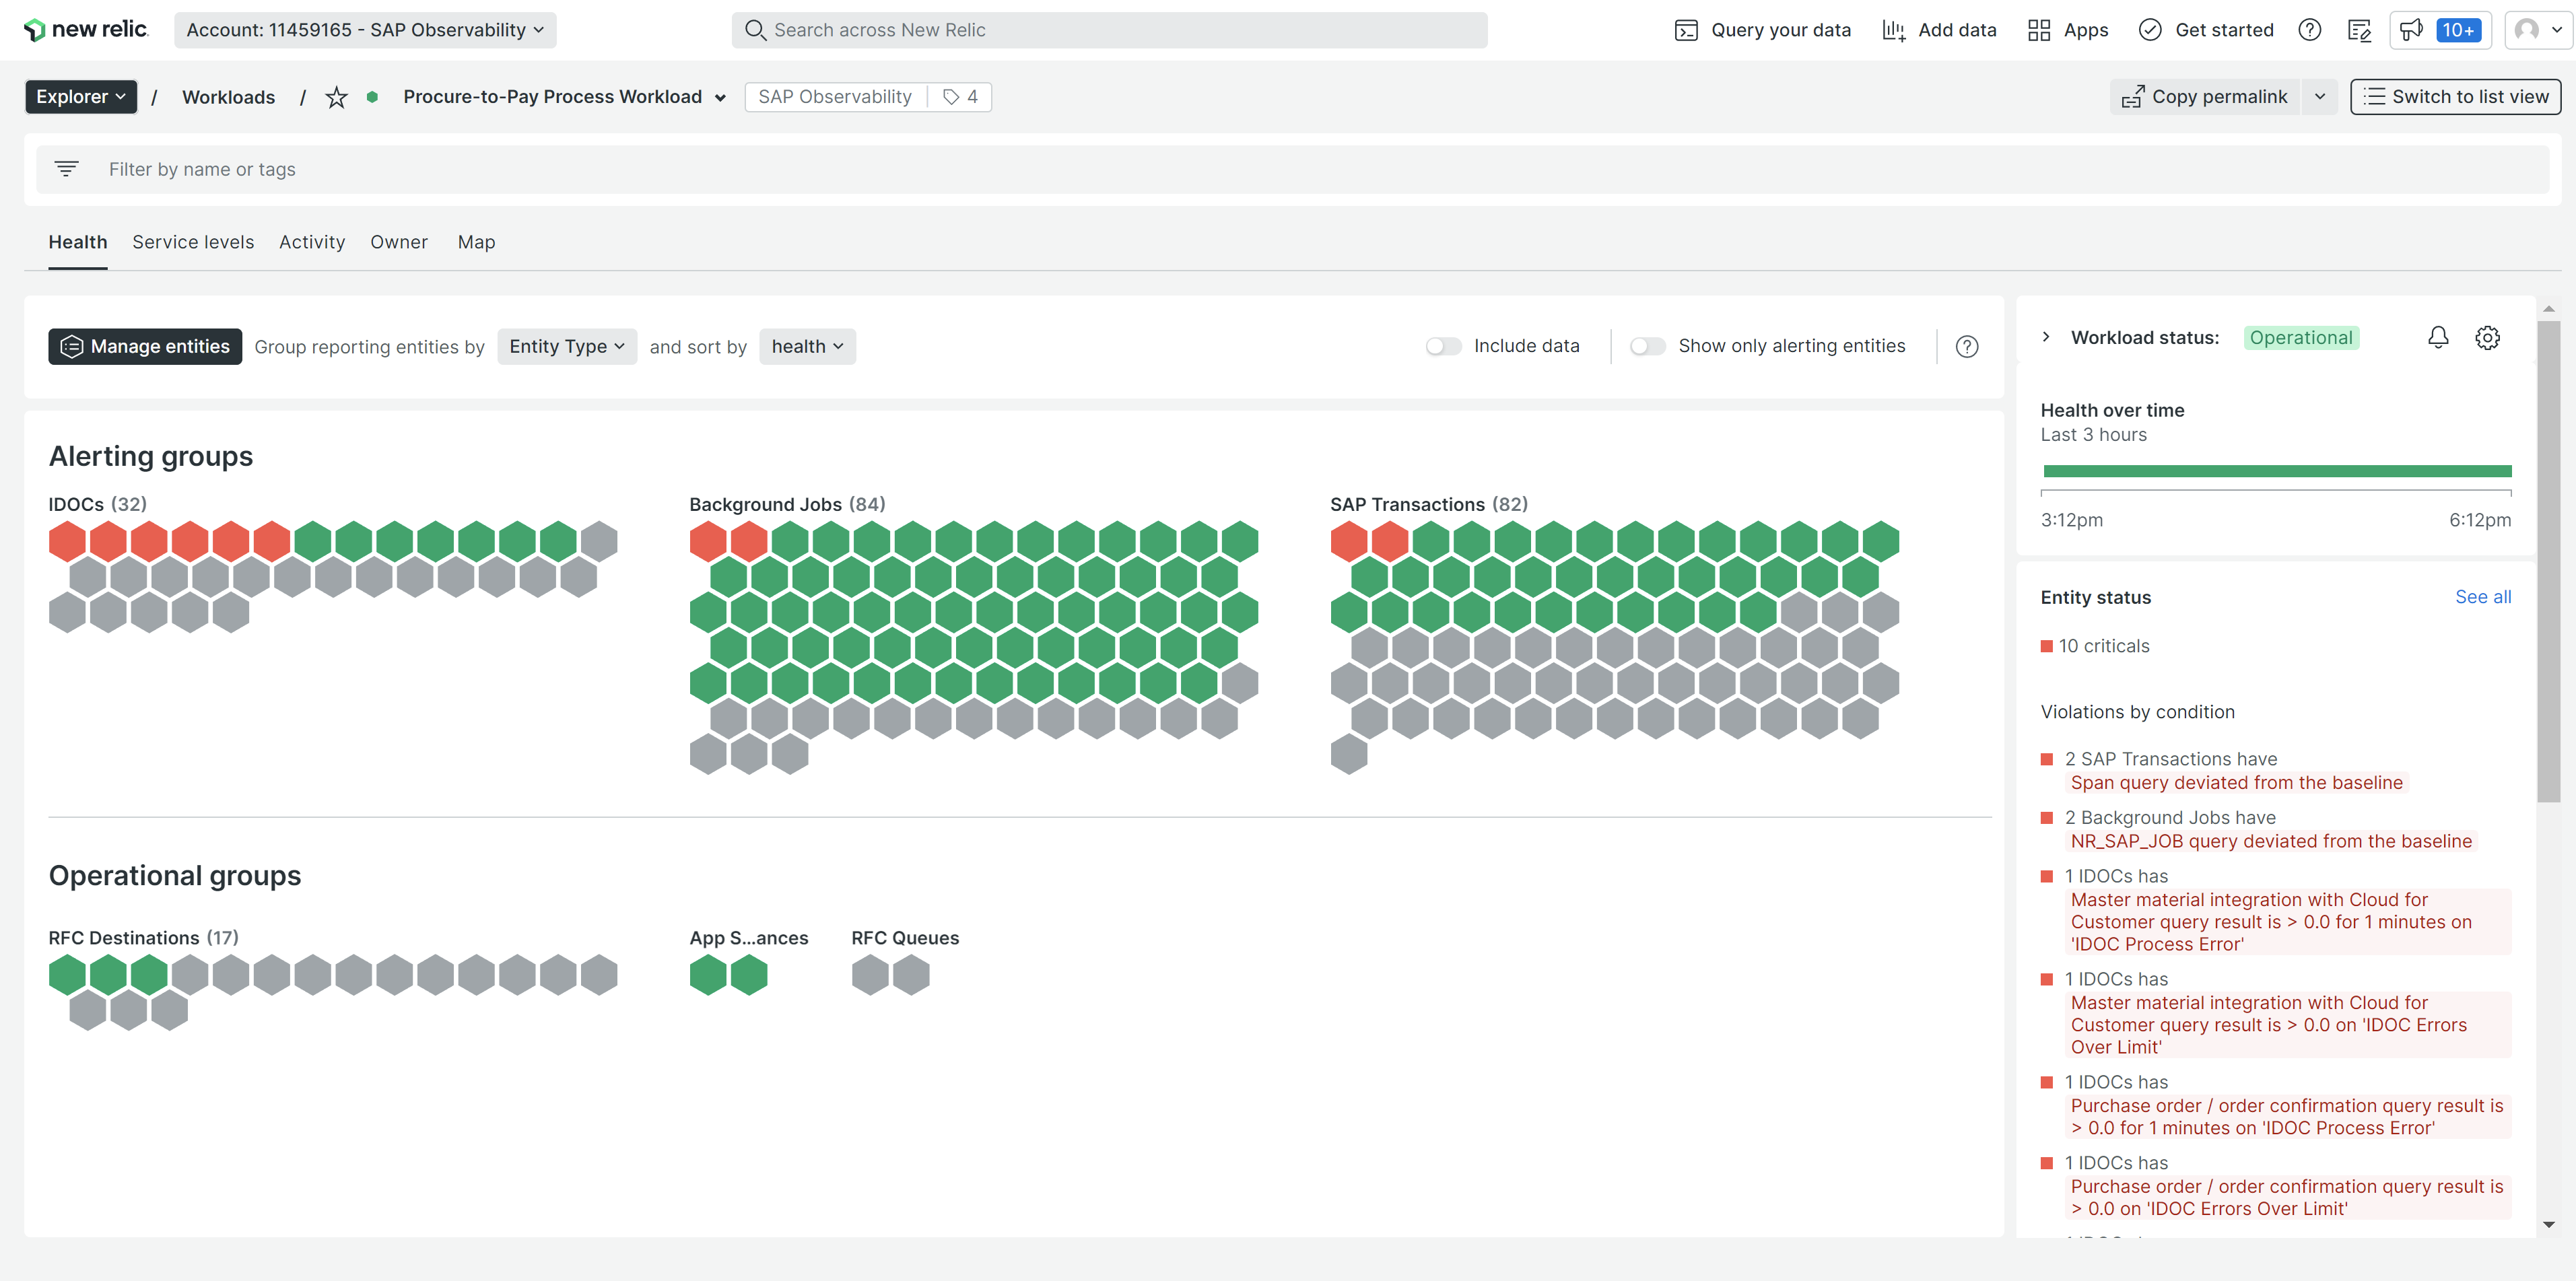
Monitor SAP® systems from a centralized view
Now you’ll be able to:
See SAP application performance and overall health data in one place. Your telemetry metrics, events, logs, and traces all come together in a central view within our UI.
View your data in relation to your business processes. Understand your infrastructure and application data from the viewpoint of your corresponding business processes, such as order-to-cash and procure-to-pay.
Spot problems quickly with visualizations. By querying and viewing relevant data in our customizable charts and dashboards, you can identify root causes and resolve problems.
Prevent problems before they occur. Use our advanced alerting functionality to be notified about problems before they impact your customers.
Install monitoring centrally for end-to-end visibility. This tool can be installed on a central monitoring server, so you won’t need to install agents on all of your SAP production servers.
The need for SAP observability
As businesses increasingly rely on a complex collection of software services to power their foundational business functions, performance issues can make a severe impact. Any latency in production orders, invoices, and status reports hinder an organization’s ability to innovate. These issues can be challenging to track down and involve issues within SAP systems and non-SAP systems.
With New Relic monitoring for SAP solutions, you get a centralized view of all of your infrastructure, application, and business processes, whether they are SAP or not. This can help your IT teams to gain early awareness and quickly resolve interruptions and system issues.
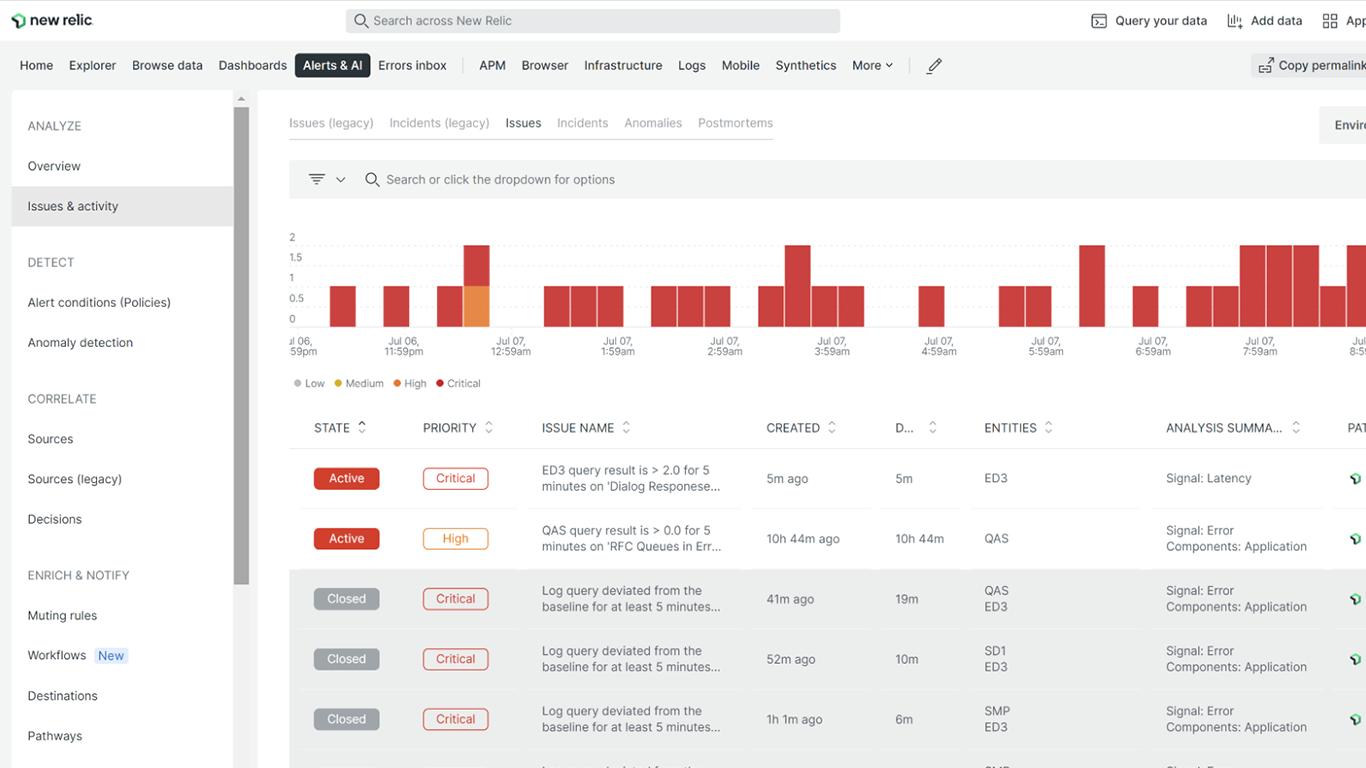
Here are some common cases where New Relic monitoring for SAP solutions can help you identify and resolve issues:
A large customer stops receiving order confirmations because IDocs were sent to a failed partner port.
Accounts payable vendor invoices aren’t paid when you need them to be, due to a sudden surge of program errors in failed background jobs, caused by a recent new deployment.
Production orders aren’t going out in a timely manner because of inefficient database calls in a program.
Your users in a particular region are experiencing intermittent slowness due to an imbalance of traffic between application servers.
Best-in-class observability for SAP from New Relic
With New Relic, you can gain visibility into the performance and overall health of your entire SAP systems or individual components with an SAP-friendly integration. Monitor the underlying entities that keep your SAP processes flowing while also gaining visibility into your systems running on cloud platforms like AWS or Microsoft Azure.
Prebuilt visualizations
New Relic provides curated and extensible visualization tools such as dashboards, entities, workloads, and traces, including anomaly detection and alerts. You’ll be able to monitor both SAP and non-SAP systems from a single view. In addition, business and IT team members can access the same views on SAP performance to drive efficient communication and collaboration.
Centralized end-to-end observability
Access all telemetry data such as logs, metrics, events, and traces from your multiple SAP systems in one place, with the ability to easily query historical performance and current trends.
Workloads in context of business processes
New Relic brings business context to your monitoring, based on your business process workload, as shown in the next screenshot.
SAP IDoc explorer
With our SAP IDocs explorer, you’ll get a visual representation of IDoc errors. They’re accompanied by relevant information and context to help you resolve those errors, allowing business processes to keep flowing.
Fast root cause identification with SAP traces
Get automatic insights into the possible root cause of issues, including relevant deployment info, error logs, and attributes.
Dynamic baseline alerts
Using dynamic thresholds, your alerts will automatically adjust to unforeseen flow changes or other shifts in your business.
Samir Ahuja leads Business Observability for New Relic. His team delivers solutions that leverage New Relic’s powerful observability tools for the monitoring of business applications and processes such as those within SAP, as well as those spanning multiple systems.
What Is SCIM Provisioning? How It Works, Benefits, and More
What Is SCIM Provisioning?
System for Cross-domain Identity Management (SCIM) is an open standard that simplifies cloud identity management and allows user provisioning to be automated across multiple domains.
SCIM supports the exchange of user identity data between an enterprise identity provider (or an identity and access management system) and cloud service providers by providing an easy way to grant users access to cloud-based applications, while keeping sensitive data secure. It alleviates the burden of manual provisioning and gives employees a frictionless user experience.
What is SCIM protocol?
The SCIM protocol is an application-level standard that enables secure management and exchange of identity data across domains. Based on JavaScript Object Notation (JSON) and Representational State Transfer (REST), the SCIM standard leverages REST APIs to facilitate the creation, modification, retrieval, and discovery of identity resources, including users and groups.
Importance of SCIM Provisioning
The recent and rapid adoption of cloud-based applications has made SCIM user provisioning a vital part of the identity management landscape. With the average enterprise using nearly 1,300 cloud services, companies need a secure, cost-effective way to automate provisioning and manage the user lifecycle in the cloud.
SCIM provides the scalability growing companies need. As organizations hire more employees and adopt more cloud-based applications, identity and access management becomes increasingly complex. Managing large numbers of accounts manually consumes valuable IT time, introduces errors, and impedes productivity. SCIM solves these problems and offers additional advantages.
Benefits of SCIM Provisioning
Perhaps the greatest benefit of SCIM is that it provides a standardized, secure methodology for exchanging information between IT systems. This ensures interoperability across domains without expensive custom integrations.
SCIM allows single sign-on (SSO), which increases security compliance and reduces the attack surface malicious actors could exploit. Automating individual users’ access and SCIM group provisioning significantly reduces manual efforts and mitigates the risk of human error and zombie accounts. A modern SCIM tool simplifies employee onboarding and offboarding and provides visibility into all IT infrastructure.
Finally, SCIM auto-provisioning increases productivity across the entire organization. Besides freeing up IT teams to focus on more valuable tasks, SCIM, in partnership with access management, reduces the time needed to grant access to backend infrastructure, giving employees a productivity boost. Together, these benefits improve the return on investment (ROI) on IT infrastructure and reduce the total cost of ownership (TCO).
How Does SCIM Work?
SCIM defines a schema for representing user and group identities and provides a REST API for managing identity lifecycles. The API leverages common HTTP request methods (e.g., POST, GET, DELETE, etc.) to perform Create, Read, Update, and Delete (CRUD) operations on identities.
In SCIM, the “client”is the company’s IAM system or identity provider (SCIM IdP) and the “service provider” is typically a software-as-a-service (SaaS) application, such as Salesforce or Zoom. The client stores and manages the identities and permissions the service providers require. When an administrator creates, changes, or deletes an account on the client side, SCIM updates the service provider side automatically, keeping all systems in sync.
Defining core identity resources in a SCIM environment enables clients and service providers to communicate user identity data securely. Because SCIM supports interoperability across domains, it integrates seamlessly with cloud-based applications and works with other enterprise security tools, such as firewalls.
SCIM vs. SAML vs. SSO
SCIM vs. SAML
Security Assertion Markup Language (SAML) is an XML-based standard that enables authentication based on the user credentials stored in an enterprise identity and access management (IAM) system. While the global SAML market continues to grow and SAML provides an easy way to manage access to the resources an organization hosts, it is an ineffective system used on its own for cross-domain identity management
Organizations that use cloud-based solutions need a method for managing user access to resources in external providers’ domains. SCIM provisioning provides a way to automate access to all the applications and services an organization uses. Without SCIM, IT administrators would need to create and maintain external user accounts manually—a very complex and time-consuming task.
SCIM vs. SSO
Single sign-on (SSO) is an authentication method that enables users to access multiple applications using a single set of login credentials—typically, a username and password. It strengthens security and eliminates the need for users to remember a separate set of credentials for every application they access.
While SCIM and single sign-on (SSO) work together, each serves a different purpose. SCIM provides an easy way to provision users’ access across multiple domains, whereas SSO performs SCIM authentication by verifying users’ credentials.
How StrongDM Helps You Adopt SCIM Provisioning
StrongDM’s simplified SCIM auto-provisioning dramatically reduces the time needed to grant access requests, allowing employees to get into the resources they need more quickly. You can choose which users and groups you want your identity provider to manage, synchronize role-based access controls, manage policy exceptions, and more.
StrongDM integrates seamlessly with any SCIM-based directory service, such as Okta, Azure AD, or Google. Tighter SCIM integrations enable you to manage just-in-time, least-privilege access to critical infrastructure directly from your identity provider.
With StrongDM’s powerful set of attribute-based rules, you can grant access dynamically whenever a resource is spun up or spun down. Besides providing the flexibility needed in today’s ephemeral computing environments, rules eliminate costly manual administration and give organizations more granular control when provisioning infrastructure.
Save Time and Money by Simplifying Provisioning with StrongDM
StrongDM’s People-First Access platform provides a single source of truth for cloud identity management. It eases friction, streamlines user provisioning and deprovisioning SCIM tasks, reduces IT costs, and helps employees get access to the resources they need faster—all without sacrificing Zero Trust security.
Schuyler Brown, Co-founder / CCO, began working with startups as one of the first employees at Cross Commerce Media. Since then, he has worked at the venture capital firms DFJ Gotham and High Peaks Venture Partners. He is also the host of Founders@Fail and author of Inc.com’s “Failing Forward” column, where he interviews veteran entrepreneurs about the bumps, bruises, and reality of life in the startup trenches. His leadership philosophy: be humble enough to realize you don’t know everything and curious enough to want to learn more. He holds a B.A. and M.B.A. from Columbia University.
Webiscope is now part of Aman Group
We are happy to announce that Webiscope is now part of Aman Group. We look forward giving our customers and partners greater value with more complete solutions and outstanding service.
This website uses cookies so that we can provide you with the best user experience possible. Cookie information is stored in your browser and performs functions such as recognising you when you return to our website and helping our team to understand which sections of the website you find most interesting and useful.
Strictly Necessary Cookies
Strictly Necessary Cookie should be enabled at all times so that we can save your preferences for cookie settings.
If you disable this cookie, we will not be able to save your preferences. This means that every time you visit this website you will need to enable or disable cookies again.